
Penelope -- A Pattern Tile Editor

Ralph E. Griswold

Department of Computer Science
The University of Arizona
Tucson, Arizona

IPD234b
April 9, 1996
http://www.cs.arizona.edu/icon/docs/ipd234.htm

Tiles and Patterns

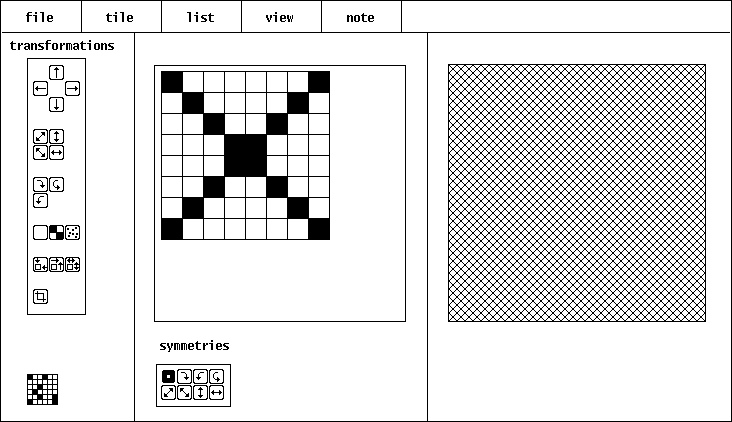
A pattern tile is a small rectangular bitmap that is used to produce a pattern when drawing lines and filling shapes. Conceptually, the tile is aligned at the upper-left corner of the window and replicated as necessary to fill the window. When a line is drawn or a shape is filled, the pattern produced by the tiling "shows through" in the filled area. For example the 8-by-8 tile

produces the pattern

In order for lines and filled shapes to be patterened, the fill style must be textured or masked. In the case of textured, pixels that correspond to bits set in the tile are drawn in the foreground color and all other pixels are drawn in the background color. In the case of stippled, only foreground pixels are drawn, leaving the background pixels as they were. The function Pattern(s) sets the tile to be used, where s is a string that encodes the bits of the pattern. See Reference 1 for the ways that tiles can be encoded as strings.

For example, in a window with a white background and a black foreground,
WAttrib("fillstyle=textured")
Pattern(mesh)
FilllRectangle(0, 0, 100, 50)
draws a 100-by-50 rectangle filled in the pattern mesh.
Tiles used for patterns are limited in size. The maximum width (number of columns) is 32. X supports 32-column tiles, but most other window systems are more restrictive. X does not limit the depth (number of rows), but most other window systems do. X also supports odd-sized tiles, such as 13-by-17, but most window systems only allow even-sized tiles. 8-by-8 and 4-by-4 tiles are the most portable.

About Penelope

Penelope is an application for creating and editing tiles. Penelope works on a list of tiles. There always is a current tile on which operations are performed. Penelope supports the following operations on tiles:

1. Setting and clearing the individual bits of a tile. Symmetry modes allow performing these operations on symmetric positions of a tile.

2. Transforming tiles in various ways, such as shifting, flipping, and rotating.

3. Trimming, enlarging, resizing, and cropping tiles.

4. Adding annotations to tiles.

Operations on the tile list include:

1. Adding new tiles.

2. Deleting existing tiles.

3. Sorting in various ways.

These operations are described in more detail in subsequent sections.

The Penelope Window

Penelope provides a window for displaying various aspects of a tile and through which various operations can be performed:


The bar at the top contains pull-down menus for various operations. At the left side of the window is a collection of buttons for performing transformations on the current tile. To the right of these buttons is an editing grid in which the current tile is shown. Black cells on this grid correspond to tile bits that are set. To the right of the editing grid is a view area in which the pattern produced by the tile is shown. Below the editing grid are buttons that control editing symmetries. The Penelope logo appears in the bottom-left corner of the window.

In addition to the operations that can be performed through menus and buttons, there are keyboard shortcuts that cause operations to be performed as the result of typed commands. These shortcuts all consist of typing a single character while the meta key is depressed. For example, typing q with the meta key depressed terminates the current Penelope session.

Most of the keyboard shortcuts correspond to menu items and are shown when a menu is pulled down. By convention, @ indicates the use of the meta key. Letters are shown in uppercase for legibility, but they are entered in lowercase. Thus, @Q signifies typing q with the meta key depressed.

Starting a Penelope Session

Penelope is launched from the command line as
penelope [file]
where file is the name of a file that contains tile specifications. If file is omitted, Penelope starts with a list that consists of a single 8-by-8 blank tile. If file is given, the tile specifications contained in it are loaded into Penelope's tile list and the first one becomes the current tile.

Penelope keeps track of the file name and uses it when saving any changes made to the tile list. If no file is given on the command line when Penelope is launched, the initial file name is untitled.tle.

Basic Editing

Pressing the left mouse button on a cell in the editing grid causes the corresponding bit in the current tile to be set. Pressing the right mouse button on a cell clears the corresponding bit. Dragging while the left or right mouse button is pressed sets or clears, respectively, the cells over which the mouse pointer passes. (On some platforms, if the mouse is moved too quickly, some cells may be skipped.)

As the tile is edited, the pattern shown in the view area is updated accordingly.

Symmetric Editing

Ordinarily, the only bit of the current tile affected by editing is the one that corresponds to the cell on which a mouse button pressed. Bits in symmetric positions are affected if symmetry modes are in effect, as determined by the buttons below the editing grid:
Initially, only the top-left button is active, as indicated by the highlight. The small square in this button indicates that editing affects the selected cell. If other buttons are pressed, they become highlighted and cells in the indicated symmetric positions are affected. Examples of symmetries are show in the Appendix.

The buttons are toggles; pressing on a highlighted button removes the highlight and causes the corresponding symmetry to be disabled. It is possible to disable the normal mode in which pressing a mouse button on a cell affects the corresponding bit of the tile. If all modes are disabled, however, no editing changes can be made to the current tile.

Transformations

Pressing a mouse button on one of the buttons to the left of the editing grid transforms the current tile.

The top four buttons shift the bits of the tile by one position in the direction indicated. The shift is circular; bits shifted off one edge appear at the opposite edge:
The next four buttons flip the tile in the direction indicated:
These three buttons rotate the tile; clockwise 90°, by 180°, and counter-clockwise 90°:
The bottom four buttons change the size of the tile. The left-most button trims off any white space at the edges of the tile. The next button centers a trimmed version of the tile in a larger area. The right-most button on the first row allows the size of the tile to be changed. The button at the bottom crops the tile, removing rows and columns.
Except for trimming, dialog boxes are presented in which the values can be entered. For example, the button to enlarge a tile presents the following dialog box:

Undoing a Transformation

A transformation can be undone by entering @U (typing u with the meta key depressed) before any other change is made to the tile. @U is a toggle; entering it again restores the transformation.

Transforming All Tiles

If the shift key is pressed when a transformation button is clicked, the transformation is performed on all tiles in the tile list. If there are many tiles, this may take a while. Caution: These transformations cannot be undone.

Menus

Pressing a mouse button on a name in the menu bar causes the menu to be pulled down, allowing the selection of an operation.

The File Menu

load produces a dialog box in which the name of a file of tile specifications can be given. These tiles replace the those in the current tile list.

save
causes the current tile list to be saved in the current file.

save as
produces a dialog box in which the name of a file for saving can be specified. The name given becomes the current file name for future saves.

read
reads one tile specification from standard input and adds it to the end of the tile list. The new tile becomes the current tile.

write
writes the current tile to standard output.

quit
terminates the Penelope session.

The Tile Menu

next changes the current tile to the next tile in the list. If there is no next tile, a warning box is presented.

previous
changes the current tile to the previous tile in the list. If there is no previous tile, a warning box is presented.

first
changes the current tile to the first tile in the list

last
changes the current tile to the last tile in the list.

goto
presents a dialog box in which to specify the number of the tile to become the current tile. Negative values are relative to the end of the list.

delete
deletes the current tile from the list. This operation cannot be undone.

revert
restores the current tile to its state before any editing or transformations were done to it. Reversion is not possible once the current tile is changed to another tile.

copy
adds a copy of the current tile to the end of the tile list and makes the new tile the current tile.

new
creates a new, blank tile. A dialog box is presented for specifying the size of the new tile. The new tile is added to the end of the tile list and becomes the current tile.

info
produces a box with information about the current tile, as in
The first line gives the name of the file corresponding to the tile list, the position of the tile in the list and the total number of tiles in the list. The second line gives information about the tile: its size, the number of bits set in it, and its density (the percentage of set bits). The third line gives the hexadecimal specification for the tile. If the specification is too long to fit in the box, ellipses are show at the end. The line is long enough to show the entire specification for a 12-by-12 square tile.

The List Menu

clear deletes all tiles in the tile list and replaces them by a single blank 8-by-8 tile. This operation cannot be undone.

reverse
reverses the order of the tiles in the tile list.

delete
range presents a dialog box in which a range of consecutive tiles to be deleted can be specified. This operation cannot be undone.

sort
brings up a submenu of sorting operations:
by size sorts the tiles by the increasing number of bits in them.

by bits sorts the tiles by increasing order of the number of bits set in them.

by notes
sorts the tiles in alphabetically increasing order by their annotations. Tiles with no annotations come first.

The View Menu

pattern displays the effect of the current tile as a pattern in the view area, as in the example on page 2:
tile shows just the tile itself, as in
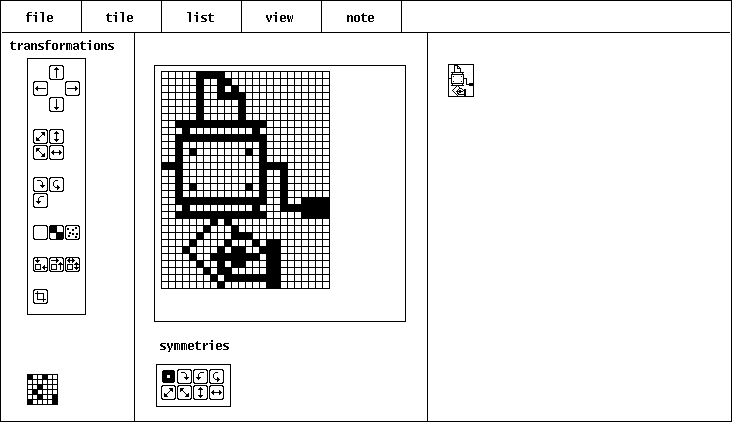
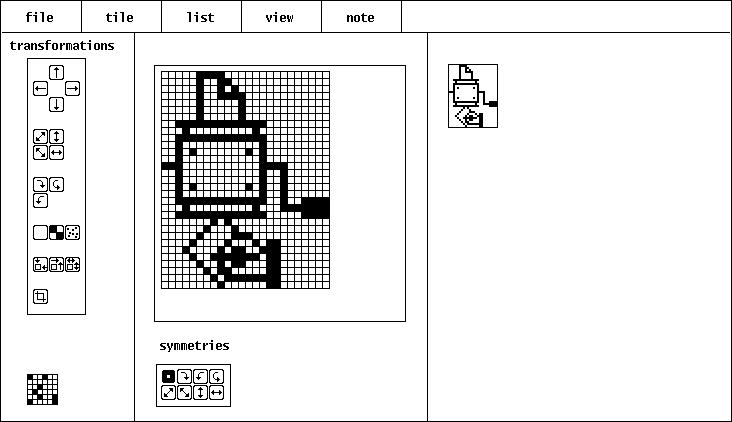
tile zoom produces a submenu for specifying a zoom factor for the tile view. Selecting one of the ratios causes the tile to view to be draw accordingly. For example, 2:1 produces this view for the tile shown above:
The Note Menu

edit produces a dialog box in which the annotation for the current tile can be edited.

find
produces a dialog box for a string to be found in annotations. If a tile with an annotation that contains this string is found, this tile becomes the current tile. The search for an annotation begins with the tile after the current tile and wraps around to the beginning of the tile list, continuing up to the current tile if necessary.

Large Tiles

Although the size of a tile that can be used for a pattern is limited, Penelope allows the creation and editing of tiles up to 80-by-80. Very large tiles are, however, difficult to edit because of the small cell size shown in the editing grid.

Tile Lists

There is no limit to the number of tiles in a tile list except the amount of available memory. It does, however, take a considerable amount of time to load the tile list from a file that contains many tile specifications.

Precautions

Penelope does not save the tile list automatically. When doing important work or working in Penelope for a long period of time, it is advisable to save the tile list from time to time.

The Format of Files Containing Tile Specifications

Each tile specification contained in a file must be complete on a single line. Annotations may follow the specification, white space, and a #, as in
8,#8142241818244281	# mesh
Blank lines and lines that begin with a # are ignored by Penelope but are not preserved when its tile list is saved in a file.

Acknowledgment

Penelope is based on a pattern tile editor written by Gregg Townsend. Gregg also provided numerous suggestions and constructive criticisms during the development of Penelope.

Reference

Gregg M. Townsend, Ralph E. Griswold, and Clinton L. Jeffery, Graphics Facilities for the Icon Programming Language; Version 9.1, IPD268, Department of Computer Science, The University of Arizona, 1994.
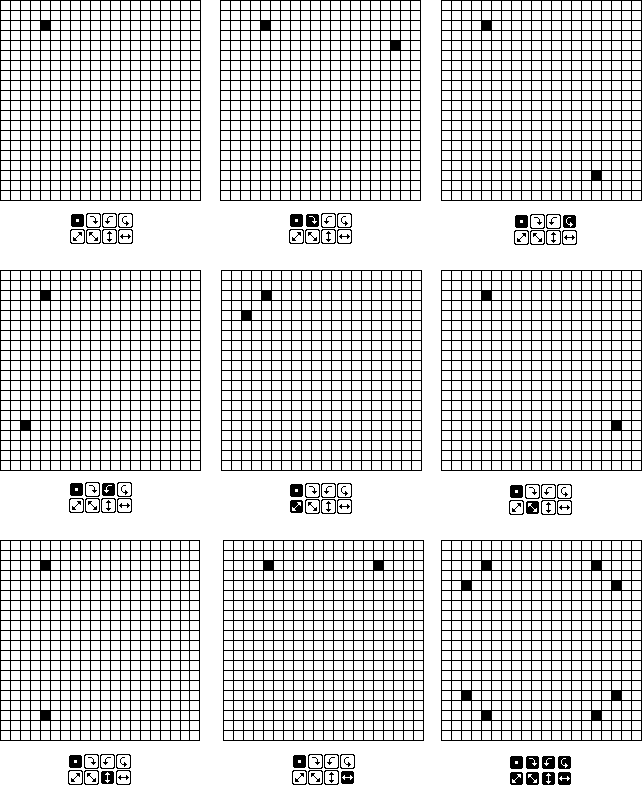

Appendix -- Examples of Editing Symmetries

The editing grids shown below resulted from clicking on the cell in the fifth column and third row. The selected symmetries are shown below the grids.


Icon home page